
SndBite is a specialized audio editor, designed for breaking large recordings into smaller components with great efficiency. Its principal intended application is in linguistic research where it is often desirable to put each word or sentence into a separate file before further processing. Special features include:
At the top is the menu bar. Next is a single-line Message region, where messages from the program appear. This is followed by the Panel, which contains boxes that provide information and allow the user to control various aspects of the program.
Following the panel are graphs of the sound pressure waveform at three different resolutions. The first, the Wavebar, provides a coarse-grained overview of the sound file. The current window is highlighted. The second, the Neighborhood window, displays the current window together with a certain amount of context. By default, the ratio of the total length of the Neighborhood window to the length of the window is 2, with the result that the lengths of the window and its neighborhood are equal. Other ratios may be set using the Neighborhood Ratio to Window box on the panel. Here again the current window is highlighted.
The highest resolution graph of the sound pressure waveform is found in the two Closeup windows. These windows are centered on the left and right edges of the window respectively. Their resolution may be changed using the Closeup Resolution box on the Panel. The current width of the region displayed is shown in the lower right corner of the left Closeup window and in the lower left corner of the right Closeup window.
In all four graphics windows a readout of the current position of the pointer is provided. It is located in the upper left corner except in the case of the right Closeup window, in which case it is located in the upper right corner.
The Neighborhood window contains three additional boxes along its bottom edge. The left and right boxes display the current position of the left and right edges of the window. The middle box displays the duration of the window.
The Closeup windows each contain an additional box in their lower inner corner. This displays the width of the region displayed.
The values provided in the boxes described, pointer locations, window edge locations, window duration, and Closeup window widths, can all be displayed in units of either seconds or samples. All boxes in the same window will use the same unit at any given time, but the various windows' units are independent of each other. Clicking on any box in a window toggles the unit for that window.


Below the Closeup windows are four rows of command buttons, discussed in more detail below.
The menubar contains six entries, of which four are menus and two are commands. The two commands, Rotate Panel Left and Rotate Panel Right, are discussed below in the section devoted to the Panel. The Character Entry menu is discussed below in the section devoted to Entering Characters.
The File menu contains commands for reading a sound file, writing the current window to a file, dealing with silences, and exiting the program. The commands for dealing with silences are discussed below in the section devoted to Setting Window Position Using Silences.

The Configure menu allows you to select various options.

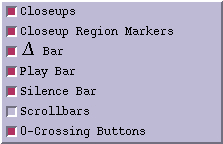
One submenu allows you to choose which portions of the main window you wish to have visible. If, for example, you are not using incremental motion, you can remove the row of buttons containing these commands.
It also allows you to choose whether or not to display the closeup region markers. By default, the neighborhoods of the window edges shown in the Closeup windows are marked in the Neighborhood window by two pairs of lines. If the Closeup windows are used at relatively low resolution this is likely to be helpful, but if the Closeup windows are used at high resolution, the lines will likely be so close together as to be more of a hindrance than a help. It is therefore possible to disable display of the closeup region markers.
Another submenu controls the panel. The checkboxes determine which boxes are present on the lazy susan and which are not. Boxes that are not present on the lazy susan are nonethless available. You can restore them to the panel if you wish. The top entry in this section allows you to determine how many boxes will be displayed on the panel at any given time.

Another submenu controls character entry tools.

A final submenu contains settings for miscellaneous parameters. These are:

The remaining entries on the Configure menu bring up the font control panel, allow you to save the current configuration, and and toggle balloon help.
The Help menu contains information about the program, including links to this manual and to the program's home page.

The Panel contains a set of boxes that provide information and allow the user to set various parameters. At any given time, from two to five boxes are visible on the Panel. The default is 3, but this may be changed via the Configure menu. This means that at any given time most of the available boxes are not visible.
The Panel operates on the same principle as a "Lazy Susan". If you rotate it, each box in turn will appear front and center. The two menu buttons Rotate Panel Left and Rotate Panel Right are used to change which boxes are visible. A rightward rotation is one in which the rightmost box disappears from view and a new box becomes visible on the left. A leftward rotation is one in which the leftmost box disappears from view and a new box comes into view on the right.
Here is the way the Panel appears when the program is started up with four boxes visible:

Here is the result of a rotation one position counterclockwise.

And here is the result of a second rotation counterclockwise.

The default order of boxes has been chosen so as to group together functionally related boxes that the user is likely to want to use at the same time. Notice that in the initial configuration above the second, third, and fourth boxes all have to do with scaling, which the user is likely to want to adjust at the outset. Another group of three boxes, shown below, are all related to silence-based positioning of the window:

Still another group of three boxes are all related to the task of writing sound segments out to files. One (the rightmost) controls the naming of the file; a second (the leftmost) allows notes to be entered into the journal file; the third (in the middle) contains a user-defined custom character entry tool that allows non-ASCII characters (in this case vowels with subscript dots and superscript tone marks) to be entered into the notes box.

It is possible to change the order of the boxes in the Panel by removing boxes and then restoring them. This works because when a box is restored it is attached to the end of the list. For example, suppose that you would like the Closeup Resolution box to follow (appear to the right of) the Neighborhood Ratio to Window box. You can reorder them by removing both, then restoring the Closeup Resolution box, and then restoring the Neighborhood Ratio to Window box.
The position of the window may be controlled in five ways:
Mouse clicks in each of the four audio windows can be used to adjust the position of the window. In the Wavebar, a left click sets the position of the beginning of the window and a right click sets the position of the end of the window. By default, the display is not updated when the beginning of the window is set in the Wavebar, on the assumption that the user will usually want to set both edges of the window. The new left edge position is recorded but no action is taken until a right click sets the right edge. This behavior may be changed via the Configure menu or the user's initialization file.
Mouse clicks in the Neighborhood window have the same effect as in the Wavebar but for the fact that both left and right clicks trigger an immediate update of the display.
In the Closeup windows, a left click in the lefthand window sets the position of the left edge of the window; a left click in the righthand window sets the position of the right edge of the window.
In general, changes in the position of the audio window triggered by mouse clicks are immediately reflected only in the graphics window that receives the mouse clicks and those below it. Thus, changes made in the Wavebar are reflected in the Neighborhood window and the Closeup windows. Changes made in the Neighborhood window are reflected in the Closeup windows but not in the Wavebar. Changes made in the Closeup windows are not reflected in either the Wavebar or the Neighborhood window. The rationale here is that in general changes in lower windows will constitute refinements of positions chose in higher windows. Leaving the higher windows unchanged makes it easier to keep track of what one is doing.
An exception to the above generalization is that the Wavebar is updated if the window is moved in the Neighborhood window so that it is no longer visible in the Wavebar.
The position of the window may be set by explicitly entering it in the Window Boundaries box on the panel. This is useful if you have particular coordinates to move to or if you need to move to a location well into a large file.

This box shows the current left and right edges of the window, either in samples or in seconds. Pressing the Go button after editing either or both of the coordinates moves the window to the position specified.
It is possible to move either or both edges of the window by a fixed increment. There are six such commands, reflecting the two directions of motion, left and right, and the movement of just the left edge of the window, just the right, or both. These commands are contained in a row of buttons with labels like: Left ⇐Δ , where the Δ stands for the fact that the motion is by a fixed increment and the arrow points in the direction of motion.

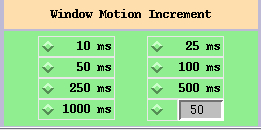
You may set the size of the increment to whatever you like via the Window Motion Increment box on the panel. You may either select one of the pre-specified increments with a mouse lick or enter the value want in the entry box at the lower right.
It is often efficient to move the window so that it straddles a segment of sound, with the left edge located at a transition from silence to sound and the right edge located at a transition from sound to silence. SndBite provides a set of six commands, located on a row of buttons, for this purpose. You may move just the left edge of the window, just the right edge, or both, either forward or backward. Because it was a problem to fit the word Silence into the available space without making the font too small or the buttons wider than desired, I have written it in Chinese characters. If you don't read Chinese, just think of it as an icon.

The silence-based movement commands rely on a list of silent intervals, which may be computed by SndBite itself or read from a file. Information about the list can be found in the Silences box on the panel. This box contains the name of the file from which the silences were read, the total number of silent intervals on the list, the number of silences on the active list, and the threshold for deciding which silent intervals to pay attention to.

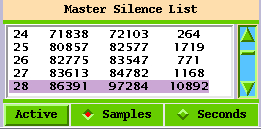
When silences are read in, they are all placed on the Master Silence List. This is the number reported as Total. The Master Silence List is then filtered to construct the Active Silence List by removing all silences whose duration is less than the specified threshold. It is the Active Silence List that is used for silence-based window motion. You may change the threshold by entering a new value in the box provided and pressing the Enter key.
You can inspect the silent intervals via the Silence List box on the panel. It displays a scrollable list of silences.
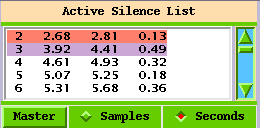
You may toggle between seconds and samples:

and between the active list and the master list:
The contents of the silence list may be saved to a file by means of the command "Save Silence List" on the File menu.
By default SndBite finds silences itself. Another way to obtain silence locations (the only way in earlier versions of SndBite) is to use the Pause program, a separate program that SndBite can execute as a child process. Pause determines the locations of silences in an audio file and generates a list in two formats. One output file, with the suffix .silences is nicely formatted and intended to be read by people. Here is a typical example:
Silent intervals in audio file Test03.wav.
Threshold = 100.
Resolution = +/-0.00050 seconds.

index	  interval 	duration (seconds)

<1>	[0.048,0.062]	 0.0140
<2>	[0.129,0.175]	 0.0459
<3>	[0.176,0.227]	 0.0509
<4>	[0.228,0.247]	 0.0190
<5>	[0.248,0.261]	 0.0130
The other, with the suffix .sf, consists of three tab-delimited columns. The first column contains the beginning of the silent interval, the second column the end, and the third the duration. Here is the portion of the file corresponding to the human-readable version above:
0.048	0.062	 0.0140
0.129	0.175	 0.0459
0.176	0.227	 0.0509
0.228	0.247	 0.0190
0.248	0.261	 0.0130
SndBite can read the .sf files generated by Pause. The command to do this is the Load Silence File command on the File menu.
SndBite can run the Pause program for you. The command Compute Silences on the File menu runs Pause on the current sound file and reads in the results if the useof Pause is the selected method of finding silences. The command Show Command Line shows you the command that SndBite executes, which you may want to know either if a problem arises or if you want to run Pause yourself.
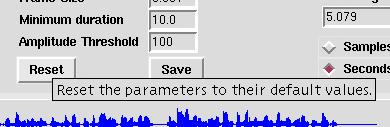
The Pause program has several parameters that may be specified on the command line. The Pause Parameters box on the panel shows you the values that SndBite is using and allows you to change them. The Reset button restores the settings to their default values.

The setting that you are most likely to want to change is the threshhold. This is the value that is used to determine whether a frame is sound or silence. If your files are noisy, you may need to increase the threshold since even nominally silent regions may contain noise.
It is more convenient to have SndBite compute the locations of silences internally because it makes it unnecessary to compile and install Pause itself as well as libsndfile, the library that Pause uses for audio i/o. There are two reasons why one might choose to use Pause rather than the internal computation.
It is often desirable to cut speech at zero-crossings (places where the sound pressure waveform changes sign). The two buttons below each of the Closeup windows move the left and right window edges respectively to the first zero-crossing preceding the current position or to the first zero-crossing following the current position.
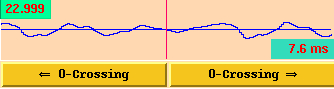
In this illustration, the right window edge has been moved to a zero-crossing.
Since the purpose of the program is to write out segments of a file, the command for doing so is readily available. The basic command is the Write Window button.

When pressed, this button writes the contents of the current window to the file whose name appears in the Next Segment File Name box in the Panel. By default the filename is generated automatically from the prefix, index, suffix, and extension. After each file is written, the index is automatically incremented.

To use another name in place of the automatically generated name, the user need only replace the name in the entry box with the name he or she wishes to use. SndBite uses the contents of the entry box as the name of the file, regardless of where it comes from. Once the file is written, the name entered by the user will be replaced by the next file name in the automatically generated sequence. The index is not incremented when the window is written to a file whose name is supplied by the user, so the automatically generated sequence is not interrupted.

The button Write Window to Previous File writes the current window to the file last written to. (Note that the name of the file last written to is shown in the Next Segment File Name box on the Panel.) This makes it easy to correct errors if one immediately realizes that an error has occurred.
Instead of generating file names automatically, you may read a list of file names from a file. Each file name should be on a line by itself. A command on the File menu causes a list of file names to be read. Whether candidate names are read from a list or generated is determined by the flag UseOutFileNameListP. This flag may be set ininitialization and script files or from the Configure menu. It is also possible to read a list of file names automatically whenever a sound file is loaded. The list of file names should have the same base name as the sound file with the suffix -SegmentNames. This is governed by the flag AutoLoadOutFileNamesP. Loading a list of file names automatically sets the flag UseOutFileNamesP.
The window may also be written to a file by means of the Save Window To File command on the File menu. This command pops up a file selection dialog, allowing the user to enter a new file name or to overwrite an existing file.
A popup window is available that contains a list of all writes to files. The display of this window is controlled from the Configure->Miscellaneous menu.
As noted above, if Autoplay is enabled, whenever the window moves its contents will be played back, and if AutoPlayWrites is set, each file is played back after it is written. It is also possible to play various regions by means of a s et of playback buttons.

Four of these buttons are dedicated to playback of the current window, the current contents of the Neighborhood window, the current contents of the Wavebar, and the entire contents of the file. The leftmost button aborts playback. The slider between Play File and Play Wavebar is a volume control.
You may need to enter non-ASCII characters in the Notes window if your notes include phonetic transcription or words in languages written in other writing systems. You may of course enter characters by typing them. You may be able to enter characters other than the ASCII characters or whatever your basic character set is by means of special keyboard input methods or by remapping your keyboard.
If you already have the necssary characters in a file or in the window of another program, you can read them from the file or copy-and-paste them from the other window.
Since SndBite is intended in large part for linguistic work, widgets are provided for entering the characters of the International Phonetic Alphabet as well as for other characters likely to be needed.

A general Unicode character tool such as gucharmap will allow you to insert any Unicode character. Here gucharmap has been used to insert the Armenian letters gim and ayb.

If you know a character's code, you can enter it by its code into a widget provided for that purpose. This is useful if you do not have a character map available or are dealing with characters that are difficult to see or for which you lack the font.

Popup charts containing the symbols of the International Phonetic Alphabet and a wide variety of letters bearing various combinations of accents and other diacritics are also provided:

If you frequently use a certain set of characters that are not available from the keyboard, you may wish to create a character entry popup of your own. To do this, you will need to find out the Unicode codes for the characters you want to use. Once you have this information, create a plain text file of the following form:
Greek|8|clearlyu|10
\u03B1|alpha
\u03B2|beta
\u03B3|gamma
\u03B4|delta
\u03B5|epsilon
\u03B6|zeta
\u03B7|eta
\u03B8|theta
\u03B9|iota
\u03BA|kappa
\u03BB|lamda
\u03BC|mu
\u03BD|nu
\u03BE|xi
\u03BF|omicron
\u03C0|pi
\u03C1|rho
\u03C3|sigma
\u03C2|final sigma
\u03C4|tau
\u03C5|upsilon
\u03C6|phi
\u03C7|chi
\u03C8|psi
\u03C9|omega
\u03DD|digamma
\u03DE|koppa
\u03E1|sampi
The first line specifies that we want eight entries per row, that the title is to be Greek Letters, and that the default font should be clearlyu at 10 point size. The remaining lines each specify one entry in the chart.
Once you have created such a file, go to the Character Entry menu and select the command Load Custom Character Chart Definition Popup to create a popup window or Load Custom Character Chart Definition Panel to create a character entry box in the Panel. You will be prompted to select a file. SndBite will read this file and create a chart like the one shown below:

A letter's gloss appears when the mouse lingers over it. The arrow in the lower right-hand corner deletes the preceding character, allowing you to erase mistakes without moving your hand back to the keyboard.
Notice that an entry for the new popup has appeared in the Characters menu. If you destroy the popup, you can recreate it by clicking on this entry.

You can create as many custom character chart popups as you like but only one Panel box. You may have only one character entry box on the panel at once, but you may replace the existing one with another. Note also that sequences of characters are acceptable.
Help is available from a number of sources in addition to this reference manual. The Help menu provides information of a variety of types, ranging from where and how to send bug reports to explanations of particular topics.
Most parts of SndBite have balloon help defined. Balloon help consists of windows that pop up when the mouse is left over a region for a certain amount of time. In some cases, balloon help only appears if you linger. In others, it appears immediately.
When SndBite starts up, it looks for an initialization file named .sbrc (SndBiteInit on MS Windows), first in the current directory, then if it does not find one there, in the user's home directory. The initialization file may be used to customize the program. Here is a sample initialization file. For purposes of illustration, many of these settings are no different from the default and could be omitted without effect.
AutoPlay				F
AutoRunPause				T
AutoScaleSound				T
#BalloonHelp				F
CloseupBackgroundColor			gainsboro
CloseupHeight				100
CloseupRegionMarkerColor		brown
CloseupResolution			15
CloseupWaveformColor			blue
CoordinateColor				black
CutMarkColor				\#FF0066
DefaultBrowser				dillo
DisplayCloseups				T
DisplayDeltaBar				T
DisplaySilenceBar			T
DrawCutMarks				T
FileIndex				001
FilePrefix				frag
FileSuffix				.wav
LazySusanBackgroundColor		gainsboro
LeftSilenceHighlightColor		tomato
MainFontFamily				Courier
MainFontSize				13
MenuFontFamily				Courier
MenuFontSize				12
MessageRegionForegroundColor		black
MessageRegionBackgroundColor		\#e9c4dc
NeighborhoodBackgroundColor		gainsboro
NeighborhoodHeight			100
NeighborhoodWaveformColor		blue
NeighborhoodWindowRatio			2
NeighborhoodWindowWaveformColor		red
PanelsToShowAtOnce			4
PauseFrameSize				0.001
PauseMinimumDuration			10.0
PauseThreshold				100
PlayMarkerColor				\#FF00B0
RightSilenceHighlightColor		orchid
SetLeftEdgeWavebarImmediate		F
SilenceThreshold			0.400
SilencesInSeconds			T
TranscriptionFontFamily			Code2000
TranscriptionFontSize			12
UseScrollbars				T
WavebarBackgroundColor			gainsboro
WavebarHeight				45
WavebarPixelsPerSecond			50
WavebarWaveformColor			blue
WavebarWindowWaveformColor		coral
WindowMotionIncrement			0.10
The initialization file is actually a Tcl program and is read by a slave Tcl interpreter. The slave interpreter is a "safe" interpreter, which imposes some restrictions on what the user can do. For example, your initialization file cannot open communications via a network socket. In other respects it is a full scale Tcl interpreter, so if you find it useful, you can include real programs in your initialization file.
For example, including the following lines in your initialization file will give you different colors for pointer position readouts and so forth depending on the hour of the day at which you start the program.
set ColorList [list \
    red blue yellow pink coral brown salmon green \
    red blue yellow pink coral brown salmon green \
    red blue yellow pink coral brown salmon green]
CoordinateColor [lindex $ColorList [clock format [clock seconds] -format %H]]
Commands can be run after startup from script files. Like initialization files, script files are executed by a slave Tcl interpreter. Initialization files and script files differ in the commands available. On the one hand, most of the configuration commands available in the initialization file are not available to script files. On the other hand, script files may make use of commands that only make sense once the program is in full operation, such as commands for reading and writing audio data.
Keyboard shortcuts may be defined for most commands available from a menu. A list of the currently defined shortcuts may be obtained from the Help menu. or, by default, by typing Control-k.
You may define additional shortcuts or override the defaults by defining shortcuts in your initialization file. The command DefineShortcut takes two arguments: the name of the command for which to create a shortcut and a specification of the key combination with which to associate the command. A list of the commands for which shortcuts may be defined is available from the Initialization File submenu of the Help menu.
Key combination specifications are of the form standard in the X Windows system, e.g. <KeyPress-a> for the letter a, <KeyPress-F1> for the first function key, and <Control-a> for the simultaneous combination of the Control key and a. Shortcuts may consist of a sequence of key presses or chords, e.g. <Control-x><Control-s>. For example, to make the simultaneous pressing of the Control key and e write the window to a file, the initialization file should contain the line:
DefineShortcut WriteWindow {<Control-e>}
If you wish you may define multiple keyboard shortcuts for the same command.
SndBite creates a file called .sb.log (SndBiteLog under MS Windows) in the user's home directory in which it logs significant information. The information logged includes the time at which the session begins and ends, what sound files are read, and what region is written to what file. This provides a complete record of the origin of each file. Notes entered via the Notes panel are also copied into the log file.
SndBite should run anywhere that Tcl/Tk, the Iwidgets library, and the Snack library are available. This includes: FreeBSD, GNU/Linux, HP-UX, Microsoft Windows, and Solaris. Since the Snack library is presently available for Mac OS X on PowerPC processors, SndBite does not run on Mac OS X on Intel processors.
SndBite uses the Snack library for audio i/o. This allows Sndbite to read audio files in the following formats:
I, Bill Poser, wrote SndBite and own the copyright to it. I license it to anyone who accepts the terms of version 3 of the GNU General Public License.